


Without a doubt, Windows is the most extensively used desktop operating system today. Windows has more features and options than any other desktop operating system. Microsoft has introduced Windows 11, the latest edition of the operating system. If you’ve recently installed Windows 11, you might want to start by changing the time zone.
You may experience internet connectivity troubles if you do not set the right Time and Date. So, if you can’t seem to discover a way to change the Time Zone in Windows 11, you’ve come to the perfect place. We’ll show you how to change your time zone on Windows 11 step by step in this article.
Steps to Change Your Time Zone on Windows 11
Normally, Windows 11 determines the time zone on your PC based on your current location. However, if location services have been deactivated, here’s how to manually alter the time zone.
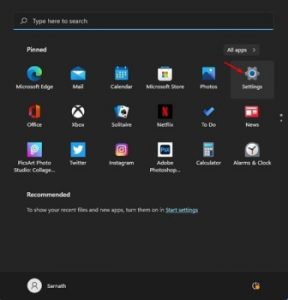
1. To begin, search for Settings using the Windows 11 search button.
2. From the drop-down menu, select the Settings app.

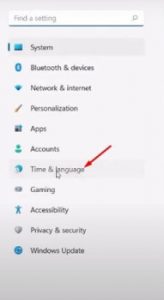
3. On the Settings screen, in the left pane, select the Time & language option.

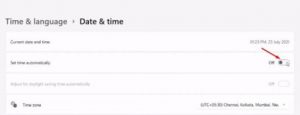
4. Select the Date & Time option from the right pane, as seen in the screenshot below.


5. Disable the option Set time zone automatically on the following screen.

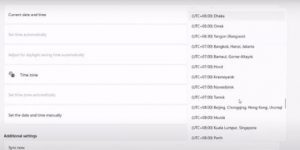
6. Click the drop-down menu next to the time zone choice and choose the time zone you want to use.

That concludes the procedure. You’ve completed your mission. You can change your time zone in Windows 11 by following the steps below.
So, how do you change your time zone in Windows 11? I hope you found this information useful. Please tell your friends about it as well. Please let us know if you have any questions or concerns in the comment section below.