


If you keep up with tech news, you may be aware that Microsoft recently released Windows 11, its latest version of the desktop operating system. The new operating system, however, is still in beta and only available to Windows Insiders.
If you’ve signed up for the Windows Insider Program, you’ll be able to download and install the Windows 11 preview builds through the updates. However, in order to run Windows 11, your system must meet the minimal system requirements.
Because Windows 11 is still in beta, expect glitches and errors while using it. Microsoft is often issuing updates to Windows 11 in order to remedy problems and faults. Windows updates, on the other hand, can make or ruin your PC.
Steps to View Windows 11 Update History
If you’re running Windows 11, you should review the Windows 11 update history. If you’re having issues, looking through the Windows 11 update history will help you figure out which one is causing the issue.
As a result, we’ll walk you through how to check Windows 11 update history in this article. The procedure will be simple to follow; simply follow the procedures listed below.
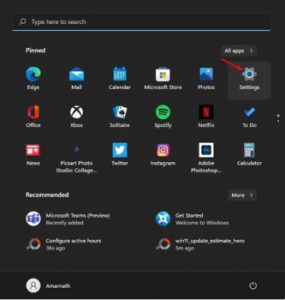
Step 1: To begin, pick ‘Settings’ from the Windows 11 start button.

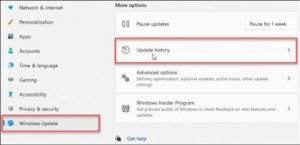
Step 2: On the Settings screen, in the left pane, select the ‘Windows Update’ option.
Step 3: On the right pane, select the ‘Update History’ option, as seen in the screenshot below.

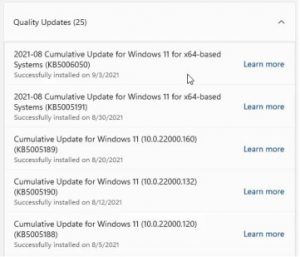
Step 4: On the next page, you’ll see a list of the updates you’ve installed:
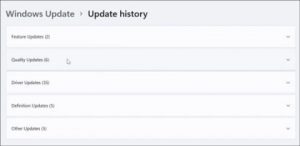

Featured Upgrades: These are the major updates that come out twice a year.
Updates that focus on increasing the quality and fixing defects are known as quality updates.
Driver Updates: You’ll find updates for your drivers in this section. It could contain a graphics card driver, a Bluetooth driver, and other components.
Changes to the definitions: This section contains updates to the built-in virus and malware protection.
Other Updates: In this part, you’ll discover updates that don’t fit into any of the other categories.
Step 5: You can expand each section to see additional information about the updates.
Step 6: To learn more about the upgrades, click the ‘Learn More’ icon beneath them.

That concludes our discussion. You’ve completed your task. This is how you may look at the update history in Windows 11. This article will show you how to view the Windows 11 update history. I hope you found this material useful! Please pass it on to your friends as well. If you have any questions, please leave them in the comments section below.